Lifting Off with Leading-Edge Inspection
MTU Aero Engines turns to PolyWorks|Inspector™ to optimize its inspection processes
When you are flying at 30,000 feet in the air at a speed of 550 mph, you understand more than ever the importance of a reliable jet engine. MTU Aero Engines, Germany's leading jet engine manufacturer, takes your safety to heart. The Daimler/Chrysler affiliate has established stringent inspection processes at every phase of its product development/manufacturing cycle to ensure the total quality of its products. To optimize and increase the scope of its inspection techniques, MTU has turned to PolyWorks|Inspector, the world-leading point cloud inspection software solution. Discover how PolyWorks|Inspector has significantly reduced MTU’s turbine blades inspection time by more than 85% while providing quality engineers with more information on the quality of parts than ever before.
The Challenge
MTU – Propulsion of the World
MTU Aero Engines GmbH is Germany's leading developer, manufacturer, and provider of repair development services of civil and military aero engine components, assemblies, and industrial gas turbines.
The company is engaged in ongoing cooperative ventures with the world's leading systems integrators and manufacturers, including Pratt & Whitney, General Electric, Rolls-Royce, Snecma, Volvo, and FiatAvio.
MTU is known for its high-tech approach to everything about its engines. It uses state-of-the-art technologies in development, manufacturing, and inspection alike. “This enables us to provide our customers with the advanced high-quality products they have a right to expect,” said Dr. Karl-Heinz Dusel, MTU’s Quality Engineer.

The Complexity of a Jet Engine
A jet engine is composed of hundreds of components that all need to be closely inspected before assembly. The inspection processes that MTU has traditionally used have proven to cause bottlenecks in the production cycle due to the slowness and complexity of the techniques used. In addition to the speed limitation, inspection equipment, such as coordinate measurement machines (CMMs), have a restricted scope, forcing quality engineers to concentrate on limited features of a part, depriving them of valuable information.
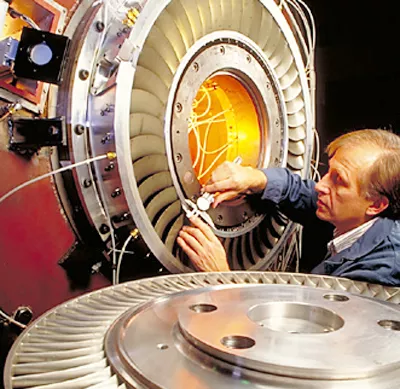
A jet engine is used to propel airplanes forward. In order to take off and fly through the sky, an airplane’s jet engine produces exhaust gases that rush out of the back of the engine. To create this tremendous energy (thrust), the engine ingests air for combustion using its fan up front. The compressor compresses the air and forces it into the combustor. The fuel is injected and mixed with the inflowing compressed air, and the fuel-air mixture is continuously burned. The resultant heat expands the gas to a multiple of its volume, causing it to escape from the combustor in a high-energy stream. The gas then rushes through the turbine blades, causing them to rotate, producing the energy needed to drive the compressor and the fan.
Turbines consist of several stages, each employing one row of stationary guide vanes and one row of moving blades. The blades, while glowing red-hot, must be strong enough to carry the centrifugal loads due to rotation at high speeds. Under such conditions, no imperfections are allowed! Every part needs to meet the most stringent design specifications.
Traditional Inspection Processes
MTU has traditionally used CMM-based inspection processes to measure the blades. This process significantly increases the lead time of the manufacturing process:
- The CMM data acquisition process takes up to 80 minutes for each blade.
- The on-site scanning of the blade is not possible during the manufacturing process, requiring MTU to bring parts to the digitizing station.
- The number of points measured are limited (hundred points), making global surface inspection impossible.
- Operating a CMM is a time-consuming task, necessitating the continuous supervision of highly trained technicians.
- Data processing, measurements, comparisons, and report generation are long processes, and require several software packages.

The Solution
Breaking the Sound Barrier with PolyWorks|Inspector
To ensure the quality of all its products, MTU worked closely with Duwe 3d—a leading-edge 3D digitizing solutions provider and distributor of PolyWorks® in Germany—to develop a custom-built inspection solution adapted to the most stringent requirements of the aerospace industry.
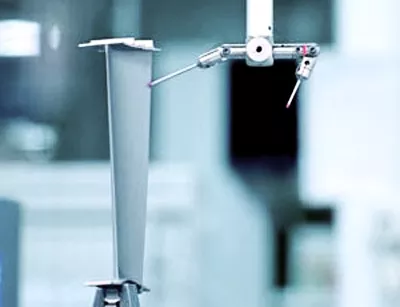
MTU now benefits from the numerous advantages of using a 3D laser-scanner system along with PolyWorks as part of their quality control processes. For the inspection of turbine blades, MTU uses a laser scanner mounted on articulated arms (FARO GoldArm & 3DScanners’ ModelMaker) to scan parts directly on-site and to capture every feature, including those located in hidden areas.
This new inspection technique has enabled MTU to dramatically reduce the time to acquire and process point clouds of its turbine blades: “One great advantage of PolyWorks is its flexibility to adapt to any kind of digitizing system”, declared Dr. Dusel. “This gives us the freedom to experiment and identify the solution that best meets our requirements. In addition to this major time saving, high-density point cloud inspection using PolyWorks gives us the possibility to apply lots of new measurement applications.”
Global Surface Inspection
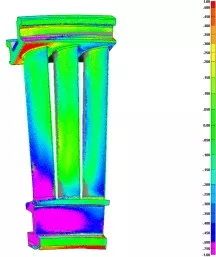
Before analyzing specific areas of the turbine blades, MTU globally evaluates the quality of the manufactured part by comparing each digitized point to its underlying reference point (CAD object). Quality engineers set the corresponding tolerances, and a color map is generated to illustrate the magnitude of the deviations. This technique provides a quick overview of the overall quality of the part and enables specialists to focus on areas out of predetermined tolerances for further analysis. Traditional CMM-based inspection techniques cannot provide such valuable information to quality engineers. The powerful comparison capabilities of PolyWorks does not only identify the deformities of a part, but also help quality engineers to identify the source of the problem along the manufacturing process and correct it.
PolyWorks’ point-to-CAD comparison techniques are fully customizable and more accurate than any other point-cloud processing software solution on the market.
Profile Analysis
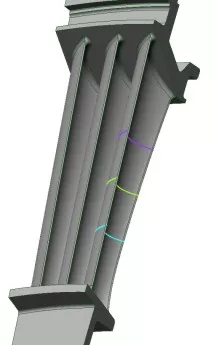
Profiles are the most important geometry of a blade since they have a direct impact on the gas flow. Cross-sections are used to calculate the aerodynamics of each blade.
The profile analysis is performed using the sophisticated cross-sectional analysis capabilities of PolyWorks. A cross-section on a part is a 2D profile obtained by intersecting a plane with the object’s surface; it is a “slice” of the object. For each slice, both a data profile and a reference (CAD) profile are created. To obtain a precise analysis of each profile, PolyWorks offers local alignment capabilities (local best-fit).
Cross-section color maps are generated in accordance with user-defined tolerances. PolyWorks also displays tolerance bands along with the CAD and data profiles.
One important advantage of PolyWorks is its ability to provide the “real” deviations, irrespective of the angle between the cross-sections and the normal of a surface.


Leading-Edge Inspection: Virtual Gauging
PolyWorks offers unique virtual gauging capabilities through 3D calipers. These tools are solid cylinders that are positioned in 3D space and extended until they hit a point, a triangle, or a NURBS surface. In this case, calipers are used to obtain the exact position of strategic points on the “leading-edge” of the blades. The leading-edge is a critical factor influencing the aerodynamics of the gas flow.
“PolyWorks virtually replicates typical physical gauge inspection processes,” said Dr. Dusel. “PolyWorks’ gauging capabilities offer us valuable leading-edge information in a fraction of the time of our traditional physical measurement method, while preserving the same accuracy and precision.”
Let the Automatic Pilot Take Control
“With PolyWorks, we are in the pilot’s seat,” said Dr. Dusel. “PolyWorks lets you define your own tolerances, and gives you a constant feedback to monitor your operations. With the advanced macro-programming language capabilitie of PolyWorks, we can easily program complete inspection sequences, from first alignment to final report, in just a few minutes. Then we turn on the cruise-control device, and let PolyWorks perform an entire inspection process in just one click of a mouse using our own specifications.”
The Benefits
The benefits observed by using PolyWorks are:
- Provides more information to the quality engineers and reduces time for data analysis, calculation, etc.
- Increases the number of parts being inspected, enhancing even more the overall quality and reliability of the product
- Allows users to perform measurements at a global level (entire part), and not just specific areas such as with a CMM
- Reduces bottlenecks at the centralized inspection centers, lessening downtime on the production line